|
SCENERY SPECIFICATIONS Difficulty level: Medium - Difficult |
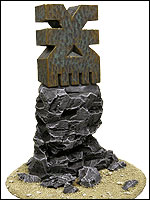
This piece of scenery can also be used in your games of Warhammer as a herdstone or monolith.
|
CONSTRUCTION |
||
|
|
1 |
Cut the MDF into a nearly circular shape with a band saw. If you don't have a band saw, use a hacksaw or handheld jigsaw. Do not use these power tools if you are young and have no parental supervision! |
|
2 |
Bevel the edges to a 45-degree angle with a belt sander. If you don't have a belt sander, try a large file. |
|
|
3 |
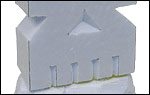
Draw a Khornate icon on a piece of paper. |
|
|
4 |
Transfer the drawing of the icon to 1" thick foam by laying the paper template over the foam and punching through at the corners with a pin or tack of some sort. You are just trying to mark the boundaries. |
|
|
5 |
Redraw the icon on the foam with a felt-tipped pen by connecting the dots you just made. |
|
|
6 |
Use an X-acto blade and a retractable hobby knife to cut away unwanted pieces of the foam to give shape to the icon. |
|
|
7 |
Flip the piece of foam over and repeat steps 3 through 6. |
|
|
8 |
Using an old rounded pencil eraser, push divots into the foam to create a texture similar to that of beaten brass. |
|
|
9 |
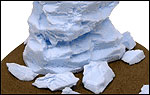
Using thicker foam (2" variety), hack out a rough, random pattern to simulate craggy stone. Try to disguise the rectangular shape of the foam. Also try digging into the foam with the retractable knife to pop out large chunks. |
|
|
10 |
Pin and glue the icon to the rock using wood glue and two pieces of paper clip cut to about 1" each. |
|
|
11 |
Glue the rock and Khornate icon to the MDF base. |
|
|
12 |
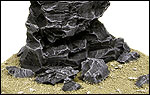
Glue foam offcuts (from carving of the rock) around the base of the pillar. Flock the base with sand and gravel as necessary. |
|
|
PAINTING |
||
|
|
1 |
Basecoat the foam with Chaos Black paint. Do NOT use spray paint for this step as it contains aerosol that dissolves Styrofoam. |
|
2 |
Spray the flocked base with Chaos Black Spray Primer once the Chaos Black paint on the foam is dry. |
|
|
The Icon |
||
|
3 |
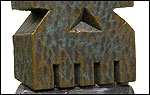
Drybrush with Vile Green. |
|
|
4 |
Drybrush with Tin Bitz. |
|
|
5 |
Lightly drybrush with Brazen Brass. |
|
|
Monolith Rock |
||
|
6 |
Drybrush with Codex Grey. |
|
|
7 |
Drybrush with Fortress Grey. |
|
|
The Base |
||
|
8 |
Heavily drybrush with Graveyard Earth. |
|
|
9 |
Drybrush with Desert Yellow. |
|
|
10 |
Drybrush lightly with Bleached Bone. |
|
|
11 |
Drybrush only the small stones with Skull White mixed with Bleached Bone (to make it look like powdered bone fragments.) |
|